Difference between revisions of "MindScale iOS POLAR App Manual E"
From Yume Cloud
(→メールアドレスの設定) |
(→Compatible models) |
||
| (6 intermediate revisions by the same user not shown) | |||
| Line 1: | Line 1: | ||
| − | = MindScale | + | = MindScale POLAR iOS App Instructions = |
| − | * | + | * This application is a MindScale application that enables you to measure sleep, work, meditation, etc. by using POLAR sensors. |
| − | * | + | * Please use this method when you cannot measure while placing your finger still. |
| − | * | + | * For research purposes, we recommend using the chest band type for stable measurements. |
| − | * | + | * For the armband type, it takes about 30 seconds after wearing it for stable measurement. |
| − | == | + | == Install == |
[[File:IOS MindScaleOHi icon.jpg|160px]] | [[File:IOS MindScaleOHi icon.jpg|160px]] | ||
| − | * App Store | + | * Download MindScaleOHi from the App Store and install it. |
| − | == | + | == Notes == |
| − | + | === Chest band type H10 === | |
| − | + | ||
| − | + | * When wearing the H10, slightly wet the sensor part of the band with water according to the instruction manual. | |
| + | * Do not move as much as possible during the measurement. | ||
| − | + | === Arm band OH1+/Verity Sense === | |
| − | + | * The best place to attach the OH1+/Verity Sense is on the outside of your upper arm. | |
| + | * OH1+/Verity Sense takes time for measurement data to stabilize. Please wait for about 1 minute without changing the position you put it on. | ||
| + | * If you change the position of the sensor, you need to wait another minute from the time you changed it. | ||
| + | * When you open the setting screen, the sensor information will be reset, so it will take about 1 minute to start measurement. | ||
| + | * Please do not move as much as possible during the measurement. | ||
| + | * OH1+/Verity Sense communicates while buffering data to some extent. As a result, the graph display is updated intermittently at intervals of about 10 seconds. | ||
| + | * The graph update interval is about 10 seconds, but the data accumulated during that time is displayed at once, so the total measurement time is the same as when using other sensors. | ||
| − | == | + | == Compatible models == |
| − | * | + | * This application supports the following two models of POLAR devices. |
| − | + | ||
| − | + | ||
| − | + | ||
| − | + | ||
| − | + | ||
| − | + | ||
| − | + | ||
| − | + | ||
| − | + | ||
| − | + | ||
| − | + | ||
| − | + | ||
| − | + | ||
| − | + | ||
| − | + | ||
=== POLAR OH1/Verity Sense === | === POLAR OH1/Verity Sense === | ||
| − | * | + | * This is an armband type pulse wave sensor. |
| − | * | + | * Wear it on your arm. |
| − | [[File:POLAR OH1 Photo.png| | + | [[File:POLAR OH1 Photo.png|400px]] |
| − | [[File: | + | [[File:Polar-hrm-armband-2.jpeg|400px]] |
=== POLAR H10 === | === POLAR H10 === | ||
| − | * | + | * It is a chest band type pulse wave sensor. |
| − | * | + | * Stable measurement is possible because it is a type that uses electrodes. |
| − | * | + | * The included band is a little short, so we recommend purchasing an extension band. |
[[File:POLAR H10 Photo.png|400px]] | [[File:POLAR H10 Photo.png|400px]] | ||
| Line 61: | Line 52: | ||
[[File:POLAR H10 Chest001.jpeg|400px]] | [[File:POLAR H10 Chest001.jpeg|400px]] | ||
| − | + | == Bluetooth permissions == | |
| − | == | + | |
[[File:OHi IMG 0763.jpg|400px]] | [[File:OHi IMG 0763.jpg|400px]] | ||
| − | * | + | * When you first start up, a message will appear asking you to allow access to Bluetooth, so allow it. |
| − | * | + | * This permission is required to communicate with sensors using Bluetooth. |
| − | == | + | == Email address and sensor ID settings == |
| − | === | + | === Email address settings === |
[[File:OHi IMG 0764 2.jpg|400px]] | [[File:OHi IMG 0764 2.jpg|400px]] | ||
| − | * | + | * Set your e-mail address, etc. |
| − | * | + | * Tap the menu icon on the top left. |
[[File:OHi IMG 0759.jpg|400px]] | [[File:OHi IMG 0759.jpg|400px]] | ||
| − | * | + | * The setting screen will be displayed, so set your email address and device ID. |
| − | * | + | * First, tap the Email Address field to set your email address. |
| − | * | + | * Enter the correct email address that you registered with the MindScale service. |
| − | * | + | * An error will occur if it is different from the email address that can be used to log in to the MindScale service. |
| − | + | ||
| − | === | + | === Setting the sensor device ID === |
[[File:IMG 1397.jpeg|400px]] | [[File:IMG 1397.jpeg|400px]] | ||
| Line 92: | Line 81: | ||
[[File:IMG 1396.jpeg|400px]] | [[File:IMG 1396.jpeg|400px]] | ||
| − | * | + | * Then set the device ID. |
| − | * | + | * The device ID is engraved on the side of your POLAR device. |
| − | * | + | * Set the device ID displayed on the sensor to the app. |
| − | * | + | * If you change the device ID, you need to restart the application. |
| − | * | + | * From the second time onwards, the email address and device ID are memorized, so there is no need to set them again. |
| − | * | + | * The setting is finished Tap the "OK" button to return to the main screen. |
| − | [[File:OHi IMG | + | [[File:OHi IMG 0759 2.jpg|400px]] |
| − | == | + | == JSON data format == |
| − | * | + | * When sending data, it will be sent in the following JSON format. |
<pre> | <pre> | ||
| Line 140: | Line 129: | ||
| − | == | + | == Pulse wave measurement == |
| − | [[File:OHi IMG | + | [[File:OHi IMG 0757.jpg|400px]] |
| − | * | + | * For wristband type sensors (such as OH1), it takes about 20 seconds for the measured value to stabilize. |
| − | * | + | * While the heart icon is spinning, it is preparing for measurement, so please wait a moment. |
| − | * | + | * For chest band sensors, measurement starts immediately. |
| − | * | + | * In the case of the chest band type sensor, the data is sent one by one, but in the case of the wrist band type sensor, it is sent in about 10 pieces. |
| − | * | + | * Therefore, when using the wristband type, the data update frequency is low and a lot of data is plotted at once, but this is normal behavior. |
| − | [[File:OHi IMG | + | [[File:OHi IMG 0758.jpg|400px]] |
| − | * | + | * If you put your finger on the sensor part, the pulse wave data will be read and displayed in a graph. |
| − | * | + | * Please measure quietly and do not move your body as much as possible during the measurement. |
| − | * | + | * It takes about 2 minutes for one measurement. |
| − | + | ||
| − | == | + | == Precautions for use == |
| − | * | + | * If you change the device ID, be sure to restart the application. |
| − | * | + | * If you can not connect, please reset the device side by the following method. |
| − | ** | + | ** For chest band: Remove from the body, wait 30 seconds, then attach to the body. |
| − | ** | + | ** For wristband: Press and hold the side switch to turn off once. Then wait about 10 seconds and then turn it on again. |
| − | * | + | * If you can't communicate with the sensor, make sure Bluetooth is turned on in the settings. |
Latest revision as of 13:54, 22 March 2023
Contents
MindScale POLAR iOS App Instructions
- This application is a MindScale application that enables you to measure sleep, work, meditation, etc. by using POLAR sensors.
- Please use this method when you cannot measure while placing your finger still.
- For research purposes, we recommend using the chest band type for stable measurements.
- For the armband type, it takes about 30 seconds after wearing it for stable measurement.
Install
- Download MindScaleOHi from the App Store and install it.
Notes
Chest band type H10
- When wearing the H10, slightly wet the sensor part of the band with water according to the instruction manual.
- Do not move as much as possible during the measurement.
Arm band OH1+/Verity Sense
- The best place to attach the OH1+/Verity Sense is on the outside of your upper arm.
- OH1+/Verity Sense takes time for measurement data to stabilize. Please wait for about 1 minute without changing the position you put it on.
- If you change the position of the sensor, you need to wait another minute from the time you changed it.
- When you open the setting screen, the sensor information will be reset, so it will take about 1 minute to start measurement.
- Please do not move as much as possible during the measurement.
- OH1+/Verity Sense communicates while buffering data to some extent. As a result, the graph display is updated intermittently at intervals of about 10 seconds.
- The graph update interval is about 10 seconds, but the data accumulated during that time is displayed at once, so the total measurement time is the same as when using other sensors.
Compatible models
- This application supports the following two models of POLAR devices.
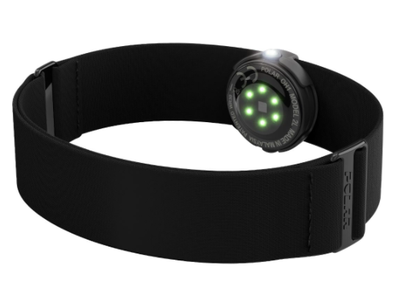
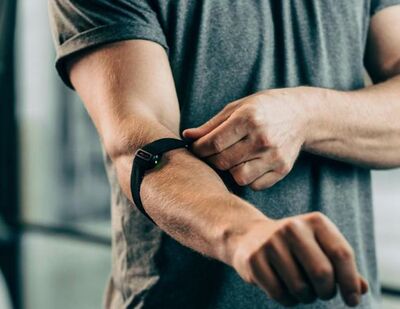
POLAR OH1/Verity Sense
- This is an armband type pulse wave sensor.
- Wear it on your arm.
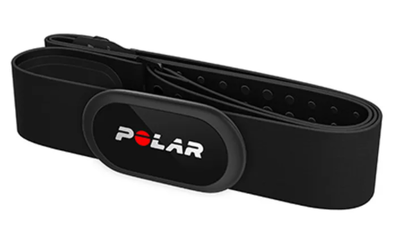
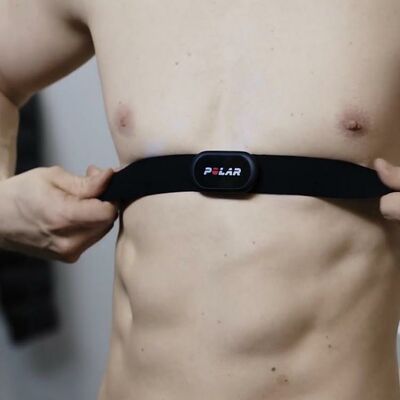
POLAR H10
- It is a chest band type pulse wave sensor.
- Stable measurement is possible because it is a type that uses electrodes.
- The included band is a little short, so we recommend purchasing an extension band.
Bluetooth permissions
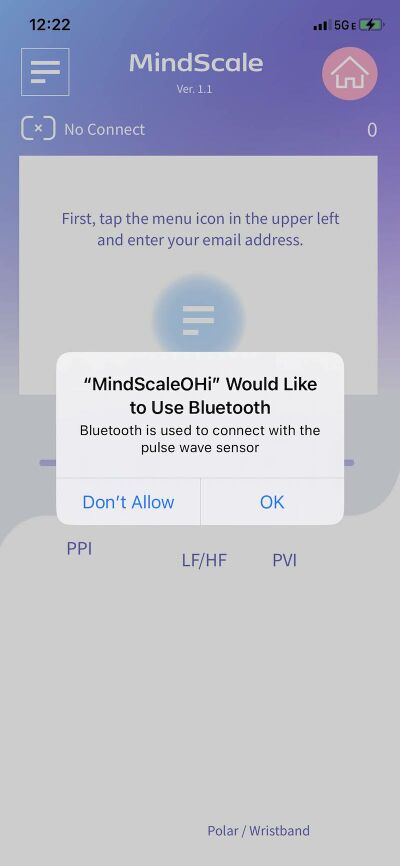
- When you first start up, a message will appear asking you to allow access to Bluetooth, so allow it.
- This permission is required to communicate with sensors using Bluetooth.
Email address and sensor ID settings
Email address settings
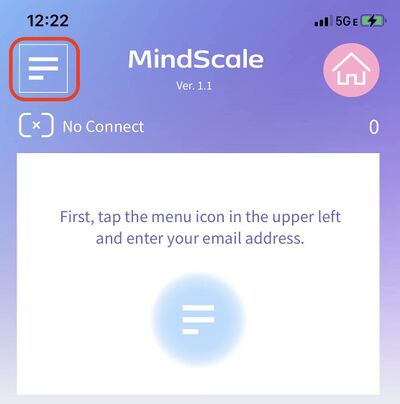
- Set your e-mail address, etc.
- Tap the menu icon on the top left.
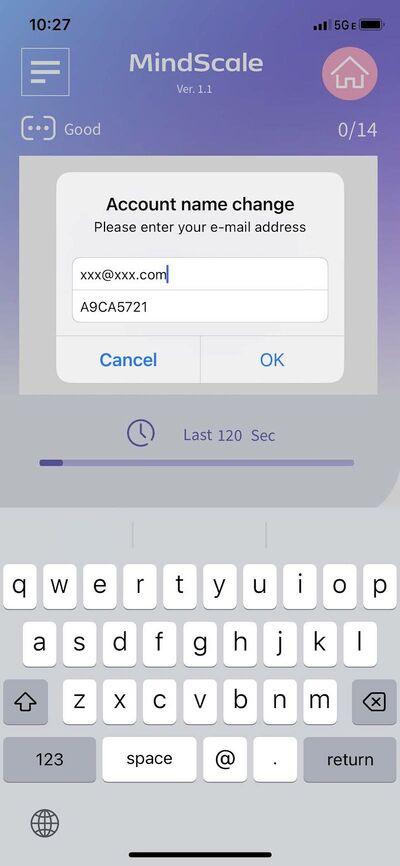
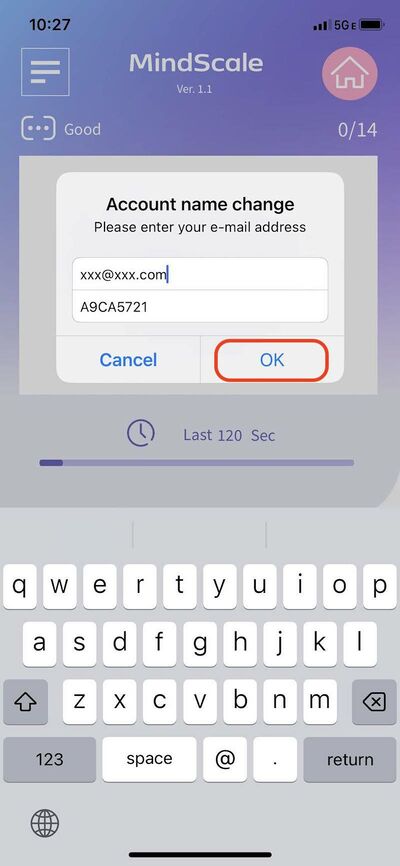
- The setting screen will be displayed, so set your email address and device ID.
- First, tap the Email Address field to set your email address.
- Enter the correct email address that you registered with the MindScale service.
- An error will occur if it is different from the email address that can be used to log in to the MindScale service.
Setting the sensor device ID
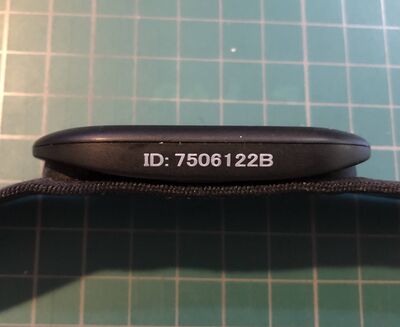
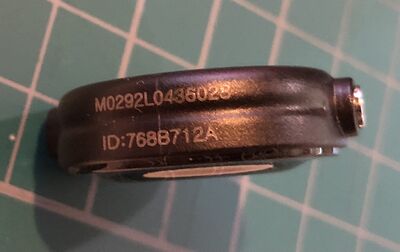
- Then set the device ID.
- The device ID is engraved on the side of your POLAR device.
- Set the device ID displayed on the sensor to the app.
- If you change the device ID, you need to restart the application.
- From the second time onwards, the email address and device ID are memorized, so there is no need to set them again.
- The setting is finished Tap the "OK" button to return to the main screen.
JSON data format
- When sending data, it will be sent in the following JSON format.
{ "title":"MindScale",
  "jsonVer":"2",
  "ver":"2.38",
  "osVer":"26",
  "id":"xxx@xxx.com",
  "time":"20210813_145149",
  "timeZone":"GMT-08:00",
  "unixTime":"1628891509306",
  "LFHF":"1.1906910240849815",
  "LF":"14070.797568778451",
  "HF":"11817.337398332647",
  "Count":"300",
  "ppi":"[
    563,
    563,
    482,
    522,
    483,
    <中略>
    463,
    482,
    422,
    523
  ]",
  "pvi":"101",
  "device":"Android",
  "sensor":"H10",
  "sensorId":"7588",
  "sensorVersion":"30",
  "done":true
}
Pulse wave measurement
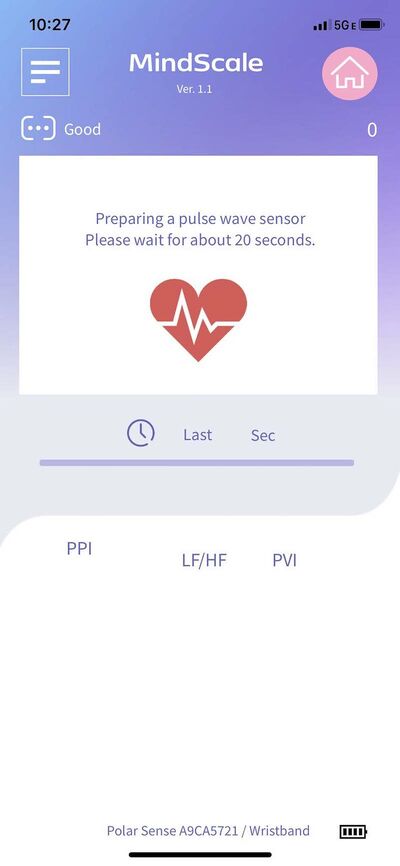
- For wristband type sensors (such as OH1), it takes about 20 seconds for the measured value to stabilize.
- While the heart icon is spinning, it is preparing for measurement, so please wait a moment.
- For chest band sensors, measurement starts immediately.
- In the case of the chest band type sensor, the data is sent one by one, but in the case of the wrist band type sensor, it is sent in about 10 pieces.
- Therefore, when using the wristband type, the data update frequency is low and a lot of data is plotted at once, but this is normal behavior.
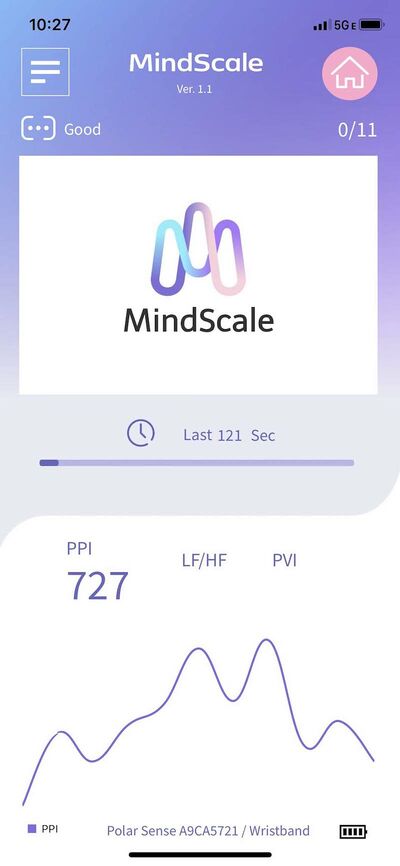
- If you put your finger on the sensor part, the pulse wave data will be read and displayed in a graph.
- Please measure quietly and do not move your body as much as possible during the measurement.
- It takes about 2 minutes for one measurement.
Precautions for use
- If you change the device ID, be sure to restart the application.
- If you can not connect, please reset the device side by the following method.
- For chest band: Remove from the body, wait 30 seconds, then attach to the body.
- For wristband: Press and hold the side switch to turn off once. Then wait about 10 seconds and then turn it on again.
- If you can't communicate with the sensor, make sure Bluetooth is turned on in the settings.
